

Mecanum Wheel Robot:
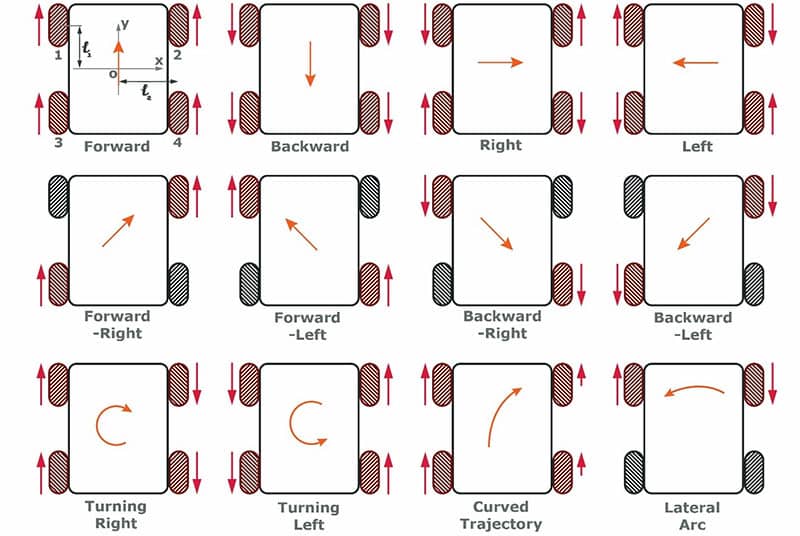
Normal Traditional wheels principle is easy you can go front and back by rotating the wheels clockwise or counter-clockwise but the this Mecanum Wheels are a little bit different. These wheels are placed in an “X” configuration. And this movement of the wheels is also different You can move the wheels in the following directions to go to different sides. These are the 12 following Combinations of movement that can be achieved from Mecanum Wheels.
Watch YouTube Video:
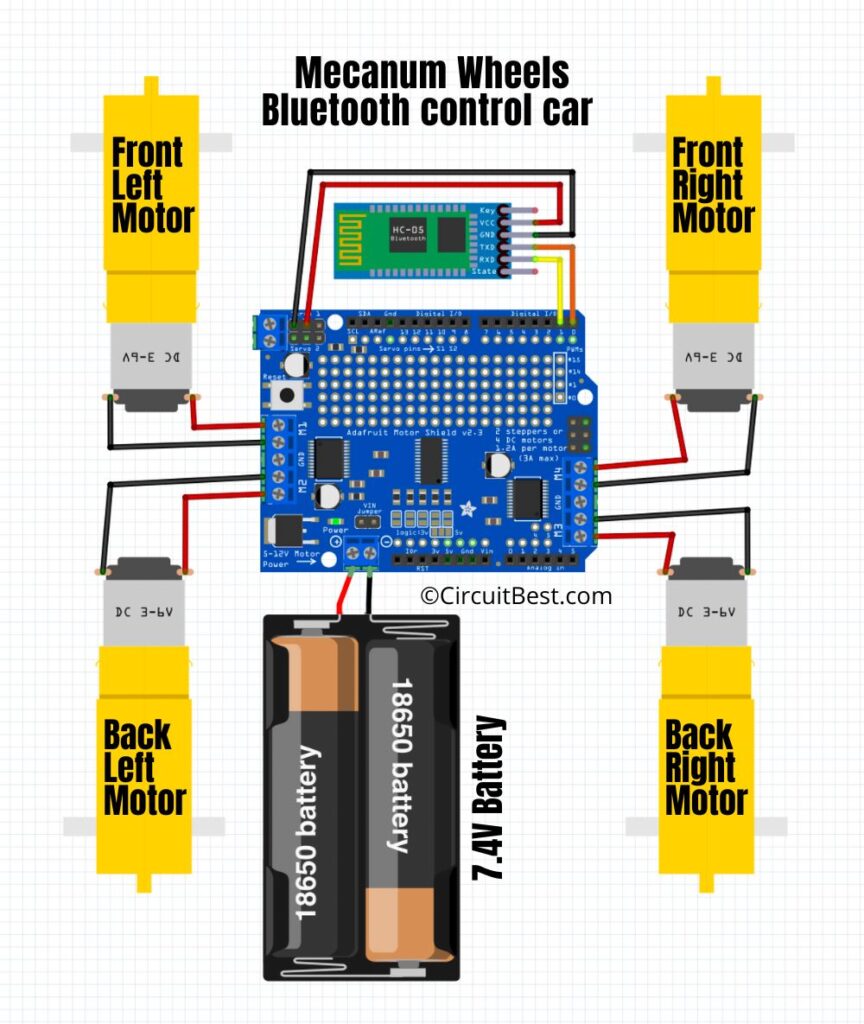
Mecanum Wheel Robot Circuit Schematics:
Mecanum Wheels Bluetooth Control robot Car Code:
/*
Code Name: Arduino Bluetooth Car with Mecanum Wheel
Code URI: https://circuitbest.com/category/arduino-projects/
Before uploading the code you have to install the "Adafruit Motor Shield" library
Open Arduino IDE >> Go to sketch >> Include Libray >> Manage Librays...  >> Search "Adafruit Motor Shield" >> Install the Library
AFMotor Library: https://learn.adafruit.com/adafruit-motor-shield/library-install
Author: Make DIY
Author URI: https://circuitbest.com/author/admin/
Description: This program is used to control a Mecanum Wheel robot using an app that communicates with Arduino through an HC-05 Bluetooth Module.
App URI: https://bit.ly/36cdPqU
Version: 1.0
License: Remixing or Changing this Thing is allowed. Commercial use is not allowed.
*/

#include <AFMotor.h>

//initial motors pin
AF_DCMotor motor1(1, MOTOR12_1KHZ);
AF_DCMotor motor2(2, MOTOR12_1KHZ);
AF_DCMotor motor3(3, MOTOR34_1KHZ);
AF_DCMotor motor4(4, MOTOR34_1KHZ);

int val;
int Speeed = 255; // Change this value between 0 to 255 for speed

void setup()
{
  Serial.begin(9600);  //Set the baud rate to your Bluetooth module.
}
void loop(){
  if(Serial.available() > 0){
    val = Serial.read();

    Stop(); //initialize with motors stoped

          if (val == 'F'){
          forward();
          }

          if (val == 'B'){
          back();
          }

          if (val == 'L'){
          left();
          }

          if (val == 'R'){
          right();
          }
          if (val == 'I'){
          topright();
          }

          if (val == 'J'){
          topleft();
          }

          if (val == 'K'){
          bottomright();
          }

          if (val == 'M'){
          bottomleft();
          }
          if (val == 'T'){
          Stop();
          }
  }
}


  /*
    Motor1= Top Left
    Motor2= Bottom Left
    Motor3= Bottom Right
    Motor4= Top Right

    Motor1, Motor4 are forward 2 Motors
    Motor2, Motor3 are backward 2 Motors

    If any of your motor is not rotating in right direction
    then please check the Wire connections.

    If you connect the Motor points as same I showed
    in the Schematics then this code is enough
    to run your car.

  */


void forward()
{
  motor1.setSpeed(Speeed);
  motor1.run(FORWARD);
  motor2.setSpeed(Speeed);
  motor2.run(BACKWARD);
  motor3.setSpeed(Speeed);
  motor3.run(FORWARD);
  motor4.setSpeed(Speeed);
  motor4.run(BACKWARD);
}

void back()
{
  motor1.setSpeed(Speeed);
  motor1.run(BACKWARD);
  motor2.setSpeed(Speeed);
  motor2.run(FORWARD);
  motor3.setSpeed(Speeed);
  motor3.run(BACKWARD);
  motor4.setSpeed(Speeed);
  motor4.run(FORWARD);
}

void left()
{

  motor1.setSpeed(Speeed);
  motor1.run(BACKWARD);
  motor2.setSpeed(Speeed);
  motor2.run(BACKWARD);
  motor3.setSpeed(Speeed);
  motor3.run(BACKWARD);
  motor4.setSpeed(Speeed);
  motor4.run(BACKWARD);


}

void right()
{

  motor1.setSpeed(Speeed);
  motor1.run(FORWARD);
  motor2.setSpeed(Speeed);
  motor2.run(FORWARD);
  motor3.setSpeed(Speeed);
  motor3.run(FORWARD);
  motor4.setSpeed(Speeed);
  motor4.run(FORWARD);

}

void topleft(){

  motor1.setSpeed(Speeed);
  motor1.run(FORWARD);
//  motor2.setSpeed(Speeed/3.1);
//  motor2.run(FORWARD);
  motor3.setSpeed(Speeed);
  motor3.run(FORWARD);
//  motor4.setSpeed(Speeed);
//  motor4.run(FORWARD);

}

void topright()
{

//  motor1.setSpeed(Speeed);
//  motor1.run(FORWARD);
  motor2.setSpeed(Speeed);
  motor2.run(BACKWARD);
//  motor3.setSpeed(Speeed/3.1);
//  motor3.run(FORWARD);
  motor4.setSpeed(Speeed);
  motor4.run(BACKWARD);

}

void bottomleft()
{

//  motor1.setSpeed(Speeed);
//  motor1.run(FORWARD);
  motor2.setSpeed(Speeed);
  motor2.run(FORWARD);
//  motor3.setSpeed(Speeed/3.1);
//  motor3.run(FORWARD);
  motor4.setSpeed(Speeed);
  motor4.run(FORWARD);


}

void bottomright()
{


  motor1.setSpeed(Speeed);
  motor1.run(BACKWARD);
//  motor2.setSpeed(Speeed/3.1);
//  motor2.run(FORWARD);
  motor3.setSpeed(Speeed);
  motor3.run(BACKWARD);
//  motor4.setSpeed(Speeed);
//  motor4.run(FORWARD);


}


void Stop()
{
  motor1.setSpeed(0);
  motor1.run(RELEASE); //stop the motor when release the button
  motor2.setSpeed(0);
  motor2.run(RELEASE);
  motor3.setSpeed(0);
  motor3.run(RELEASE);
  motor4.setSpeed(0);
  motor4.run(RELEASE);
}
Things Needed to Make DIY Arduino Mecanum Wheels Bluetooth control car using Arduino UNO, L293D Motor Driver, HC-05:
Amazon.in Links:
- Arduino UNO: https://amzn.to/31sEgU4
- TT Gear Motor: https://amzn.to/2FLFeTF
- 65MM Wheels for TT Motors: https://amzn.to/31rrghv
- HC-05: https://amzn.to/37G9fzQ
- 18650 Battery: https://amzn.to/34hsldt
- 2S, 18650 Battery Holder: https://amzn.to/2TdA1XY
- L293D Motor Driver: https://amzn.to/3dRU9s6
- Switch: https://amzn.to/3dSMREx
- Jumper Wire: https://amzn.to/2HqWHBb
- Soldering Iron: https://amzn.to/2HldvtF
- Glue Gun: https://amzn.to/3mcr51m
Amazon US Links:
- Arduino UNO R3: https://amzn.to/2SuROJC
- TT Gear Motor: https://amzn.to/3nf4l29
- Wheels: https://amzn.to/30zkFRI
- HC-05 Bluetooth Module: https://amzn.to/36w2DU5
- 18650 Battery Holder: https://amzn.to/34nOVA6
- 18650 Battery: https://amzn.to/36EeUWu
- L293D Motor Driver: https://amzn.to/3ng7Xks
- Switch: https://amzn.to/3ivaUdw
- Jumper Wires: https://amzn.to/3izMFe2
Banggood Links:
- Arduino UNO R3: http://bit.ly/2FZY6dT
- TT Gear Motor: https://bit.ly/2Mlb35E
- Wheels: https://bit.ly/2U10QPM
- HC-05 Bluetooth Module: http://bit.ly/2ukQvod
- 18650 Battery Holder: https://bit.ly/2MkPYrW
- 18650 Battery: https://bit.ly/3eBNH7N
- L298N Motor Driver: https://bit.ly/3gB8Ws6
- L293D Motor Driver: https://bit.ly/2CHPqdT
- Switch: https://bit.ly/3ds4Xfy
- Jumper Wires: https://bit.ly/2MjLy4t
Download App:
HashTag:
#DIYProject #ArduinoProject #MecanumWheels #BluetoothCar #L293D