

Bluetooth Controlled RC car – Arduino Program:
Today in this article we are going to discuss How to make a Bluetooth Controlled car using Arduino so without wasting any time let’s make the Arduino car. Arduino Bluetooth control car is a simple robot car that can be controlled by your smartphone. This Smartphone gives a Bluetooth signal to the car and from the signal, the car works.
Components used in the Arduino Car project:
- HC-05 Bluetooth: https://www.utsource.net/itm/p/7566177.html
- Arduino Uno R3 Board: https://www.utsource.net/itm/p/7281975.html
- L298N Motor Driver: https://www.utsource.net/itm/p/11527364.html
- DC Motor: https://www.utsource.net/itm/p/11527481.html
- 18650 Battery and Holder: https://www.utsource.net/itm/p/7961336.html
Tools Needed:
- Soldering Iron: https://www.utsource.net/itm/p/8423764.html
- Iron Stand: https://www.utsource.net/itm/p/7722853.html
- Nose Pliers: https://www.utsource.net/itm/p/7671655.html
- Flux: https://www.utsource.net/itm/p/8423764.html
How can I make my robot car Bluetooth?
Arduino Bluetooth control car is a simple robot car that can be controlled by your smartphone. This Smartphone gives a Bluetooth signal to the car and from the signal, the car works.
For running the car wirelessly we are using the HC-05 Bluetooth module. We connect your phone with the BlueTooth module. Then the phone sends some random characters which are stated for running the car.
In general, case, F is used for forwarding car movement. B is used for a backward car moment. Similarly, Other characters are used for other directions which are mentioned in the Arduino code.
Make Bluetooth Controlled car using Arduino:
For controlling the Motors we are using an l298n motor driver. you can also use l293d also. I chose l298n in over l293d because it has high power output. If you are interested in l293d Bluetooth car then make sure you subscribe to our YouTube channel.
Now for running the car obviously we need a power source. So, For the power source, we are using 18650 Lithium-ion cells.
You can also use any other battery which is listed below
Video Tutorial:
Watch the YouTube video from Make DIY And I hope you will understand everything.
Motor:
For the motor section, I am using a TT motor. These are some great for our Bluetooth control car project. And it has some low voltage range like 3V to 6V. So, These Motors are great for DIY projects. Here I have also added some high torque Motors well if you want more power.
Here, I have used for motors two Motors each site. Two side Motors are connected in parallel for high torque. And the two-sided Motors cables will go to the motor driver.
Motor Driver:
For the motor driver, I am using an l298n H Bridge motor driver. This is some good power output so I am using it. Now just connect two-sided motor cables with the motor driver.
The main controller Arduino Uno R3:
For the controller, I am using a basic Arduino microcontroller i.e. Arduino Uno R3. Now used double-sided tape for attaching it on the wood. And now I have connected the data warehouse with the l298n motor driver for sending the reader purses which will drive the motor.
Bluetooth module:
For the Bluetooth module, I am using HC 05 Bluetooth module. You can also use an HC-06 Bluetooth module as well. For keeping it simple I am using it.
Note: You must know that when you are uploading the code to the Arduino. You must unplug the RX and TX pin of the Bluetooth module. Otherwise, you will not be able to upload the code to the Arduino.
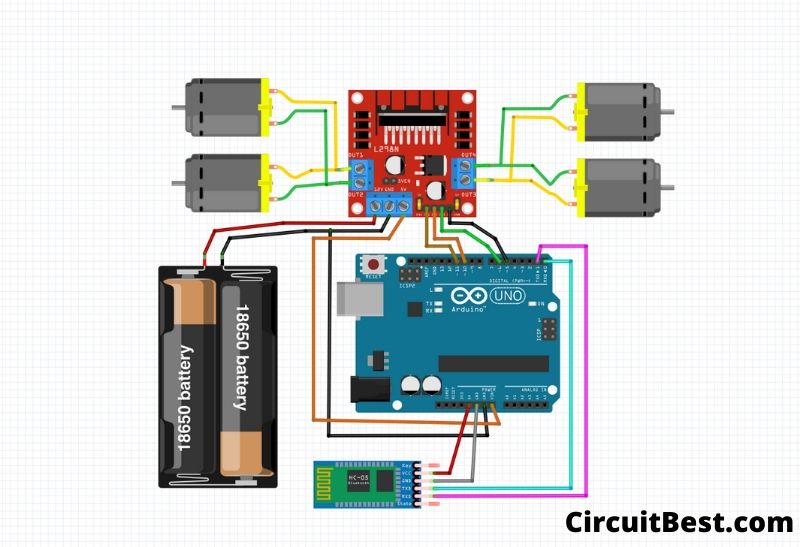
Arduino Bluetooth car circuit diagram:
Software/ Coding part:
For uploading the code choose the right board. Then choose the write com port and then compile first and then upload to Arduino. As simple as that.
Now install the app in your Android device and then open it and connect it with the Bluetooth HC 05. Now you can see the red blinking but will be changed in green. So, It means that you are connected with the Bluetooth car robot.
Next, you can perform the forward-backward Left Right functions and you can see the queries working.
/*
Code Name: Arduino Bluetooth Control Car
Code URI: https://circuitbest.com/category/arduino-projects/
Author: Make DIY
Author URI: https://circuitbest.com/author/admin/
Description: This program is used to control a robot using a app
that communicates with Arduino through a bluetooth module.
App URI: https://bit.ly/2BlMAea
Version: 1.0
License: Remixing or Changing this Thing is allowed. Commercial use is not allowed.
*/


#define in1 5 //L298n Motor Driver pins.
#define in2 6
#define in3 10
#define in4 11
#define LED 13
int command; //Int to store app command state.
int Speed = 204; // 0 - 255.
int Speedsec;
int buttonState = 0;
int lastButtonState = 0;
int Turnradius = 0; //Set the radius of a turn, 0 - 255 Note:the robot will malfunction if this is higher than int Speed.
int brakeTime = 45;
int brkonoff = 1; //1 for the electronic braking system, 0 for normal.
void setup() {
  pinMode(in1, OUTPUT);
  pinMode(in2, OUTPUT);
  pinMode(in3, OUTPUT);
  pinMode(in4, OUTPUT);
  pinMode(LED, OUTPUT); //Set the LED pin.
  Serial.begin(9600);  //Set the baud rate to your Bluetooth module.
}

void loop() {
  if (Serial.available() > 0) {
    command = Serial.read();
    Stop(); //Initialize with motors stoped.
    switch (command) {
      case 'F':
        forward();
        break;
      case 'B':
        back();
        break;
      case 'L':
        left();
        break;
      case 'R':
        right();
        break;
      case 'G':
        forwardleft();
        break;
      case 'I':
        forwardright();
        break;
      case 'H':
        backleft();
        break;
      case 'J':
        backright();
        break;
      case '0':
        Speed = 100;
        break;
      case '1':
        Speed = 140;
        break;
      case '2':
        Speed = 153;
        break;
      case '3':
        Speed = 165;
        break;
      case '4':
        Speed = 178;
        break;
      case '5':
        Speed = 191;
        break;
      case '6':
        Speed = 204;
        break;
      case '7':
        Speed = 216;
        break;
      case '8':
        Speed = 229;
        break;
      case '9':
        Speed = 242;
        break;
      case 'q':
        Speed = 255;
        break;
    }
    Speedsec = Turnradius;
    if (brkonoff == 1) {
      brakeOn();
    } else {
      brakeOff();
    }
  }
}

void forward() {
  analogWrite(in1, Speed);
  analogWrite(in3, Speed);
}

void back() {
  analogWrite(in2, Speed);
  analogWrite(in4, Speed);
}

void left() {
  analogWrite(in3, Speed);
  analogWrite(in2, Speed);
}

void right() {
  analogWrite(in4, Speed);
  analogWrite(in1, Speed);
}
void forwardleft() {
  analogWrite(in1, Speedsec);
  analogWrite(in3, Speed);
}
void forwardright() {
  analogWrite(in1, Speed);
  analogWrite(in3, Speedsec);
}
void backright() {
  analogWrite(in2, Speed);
  analogWrite(in4, Speedsec);
}
void backleft() {
  analogWrite(in2, Speedsec);
  analogWrite(in4, Speed);
}

void Stop() {
  analogWrite(in1, 0);
  analogWrite(in2, 0);
  analogWrite(in3, 0);
  analogWrite(in4, 0);
}

void brakeOn() {
  //Here's the future use: an electronic braking system!
  // read the pushbutton input pin:
  buttonState = command;
  // compare the buttonState to its previous state
  if (buttonState != lastButtonState) {
    // if the state has changed, increment the counter
    if (buttonState == 'S') {
      if (lastButtonState != buttonState) {
        digitalWrite(in1, HIGH);
        digitalWrite(in2, HIGH);
        digitalWrite(in3, HIGH);
        digitalWrite(in4, HIGH);
        delay(brakeTime);
        Stop();
      }
    }
    // save the current state as the last state,
    //for next time through the loop
    lastButtonState = buttonState;
  }
}
void brakeOff() {

}
Simple troubleshoot if the car is not going in the right direction:
If this happens and your car is not going in the right direction then you don’t have to modify any code. You have to just change the motor driver wires. Now your car will go in the right direction.
You can also read another article about Arduino projects.
My partner and I absolutely love your blog and find many of your post’s to be exactly I’m looking for. Would you offer guest writers to write content for you? I wouldn’t mind writing a post or elaborating on a few of the subjects you write concerning here. Again, awesome blog!
Thanks for finally talking about it. Liked it!
hi dear . How did you power the arduino after disconnect the data cable?