

Introduction:
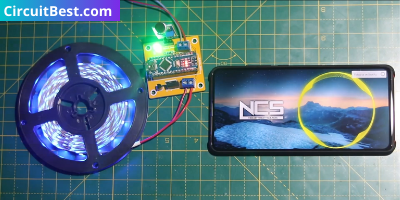
Music reactive LED Strips is great for lighting projects. You can make this with Arduino and also without Arduino. In this article, we are going to discuss how to make Music Reactive LED Strip by using Arduino Programming. The code is a simple working process is also simple. You just need to understand the working principle.
Components Lists From Utsource:
- Arduino NANO: https://www.utsource.net/itm/p/9221799.html
- PCB Board: https://www.utsource.net/itm/p/9267612.html
- 9v Battery: https://www.utsource.net/itm/p/9764845.html
- Female Header: https://www.utsource.net/itm/p/8297352.html
- Heat Shrink Tube: https://www.utsource.net/itm/p/8407893.html
- LED strip: https://www.utsource.net/itm/p/1886498.html
- Different Values of Resistor: https://www.utsource.net/itm/p/10209977.html
- Screw Terminal Block: https://www.utsource.net/itm/p/612970.html
- Sound Sensor: https://www.utsource.net/itm/p/9221424.html
- IRFZ44N MOSFET: https://www.utsource.net/itm/p/6860705.html
- BC547 Transistor: https://www.utsource.net/itm/p/382309.html
Tools Needed:
- Soldering Iron: https://www.utsource.net/itm/p/8423764.html
- Iron Stand: https://www.utsource.net/itm/p/7722853.html
- Nose Pliers: https://www.utsource.net/itm/p/7671655.html
- Flux: https://www.utsource.net/itm/p/8423764.html
Watch the YouTube Video:
If you want full detailed Instructions about the video then watch the video till the END. And you will understand everything about the Music reactive LED Strip.
Schematics of Music Reactive LED Strip:
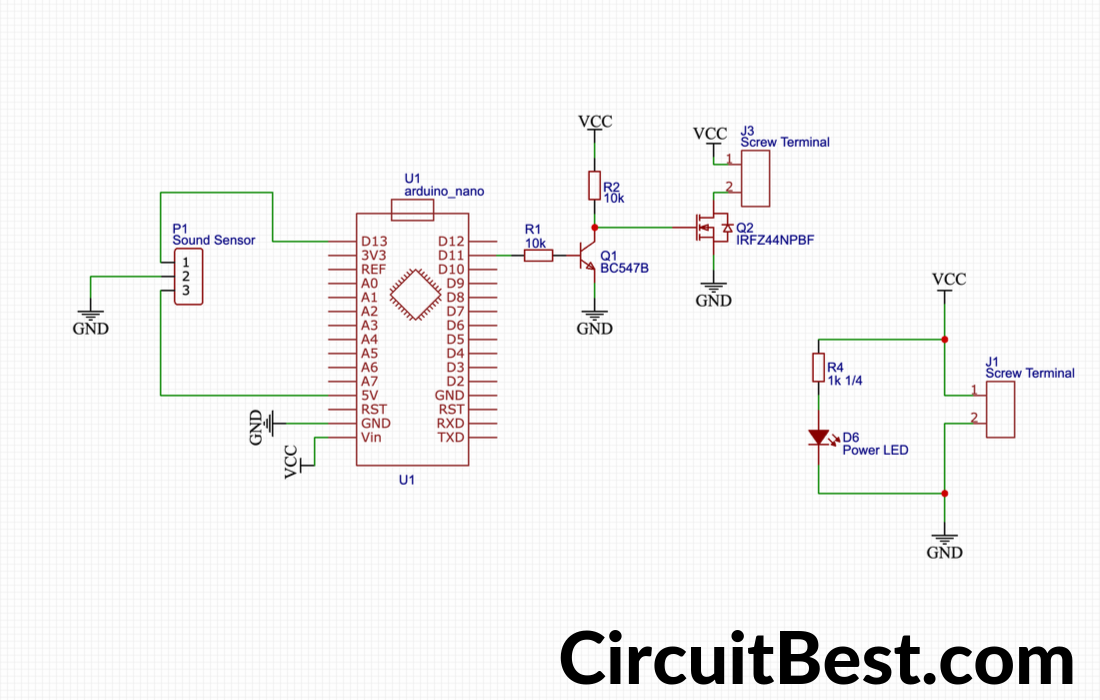
How does the Music reactive LED Strip circuit work?
This is an easy Microcontroller based project. The microcontroller gives a signal to the connected Transistor’s Base and it drives an N-Channel MOSFET. And this MOSFET drives the higher loads like LED strips.
Now let’s talk about how the signal is generated from the microcontroller. At first, the Audio sensor’s out pin gives a signal. Then it is taken through Arduino. If the signal is in a certain limit then only the led strip will run.
If the Condenser mic didn’t get a signal then the sensor module doesn’t give output. So, in this case, the LED strip will not run.
This process repeats over and over.
Instructions:
Step 1:
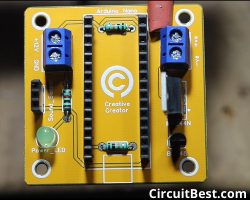
First things first you need to know how to code. So, I first made the code first and made the project in the breadboard there the project worked so, I have gone one step ahead and made schematics in Easyeda.com. then I made the PCB and ordered it from JLCPCB.com just only for 2$.

Step 2:
For the components section, I have gone with UTSOURCE. They are one of the largest component suppliers in China. They offer different types of components such as Resistors, Capacitors, ICs and many other things. You will get exclusive discounts If you order from them. So, why you are waiting for? Place your first order from UTSOURCE.
Step 3:
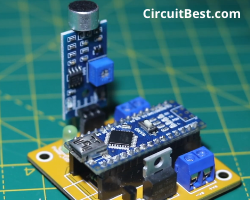
Then I gathered all the components and placed all the components into the PCB Board. And soldered all the components.
Step 4:
Uploaded the code through Arduino IDE. Then I have connected the 12v power supply and started the music to see it is working perfectly. You will need to adjust the potentiometer of the Sound Sensor Module for great adjustments.
Arduino Code:
/*
Code Name: Music Reactive Led Strip
Code URI: https://circuitbest.com/category/arduino-projects/
Author: Creative Creator
Author URI: https://www.youtube.com/channel/UCJoXoKcfAo4j9XWDlxCWMyg
Description: Music Reactive LED Strip with Arduino Nano
Version: 1.0
License: Remixing or Changing this Thing is allowed. Commercial use is not allowed.
*/


int Sound_Sensor = 13;                //initialize Sound Sensor Pin
int LED_Strip = 11;                   //initialize 12V LED Strip Pin

void setup()
{
  pinMode (Sound_Sensor, INPUT);      //define Sound Sensor as input
  pinMode (LED_Strip, OUTPUT);        //define LED Strip as output
}

void loop()
{
  int Store_Data = digitalRead (Sound_Sensor);    //define variable of the Sound Sensor status
                                                  //get the value of the Sensor

  if (Store_Data == 1)                 //When Sensor gets a signal
  {
    digitalWrite(LED_Strip, HIGH);     //LED_Strip will be on
  }

  else                                //If no signal is found
  {
    digitalWrite(LED_Strip, LOW);     //LED_Strip strip will be off
  }

}
Download Links for Music reactive LED Strip:
Note:
If you are trying to connect many LEDs then put a heat sink with the N-Channel Mosfet.Make sure that your power supply is good enough to power up those LED Strips
You can also make the circuit on the breadboard but make sure that all the connections are great otherwise you may damage the Arduino Nano.
You Can also Read our other Article About Android Controlled RGB LED Strip Using Arduino